How to Apply a Vinyl Decal
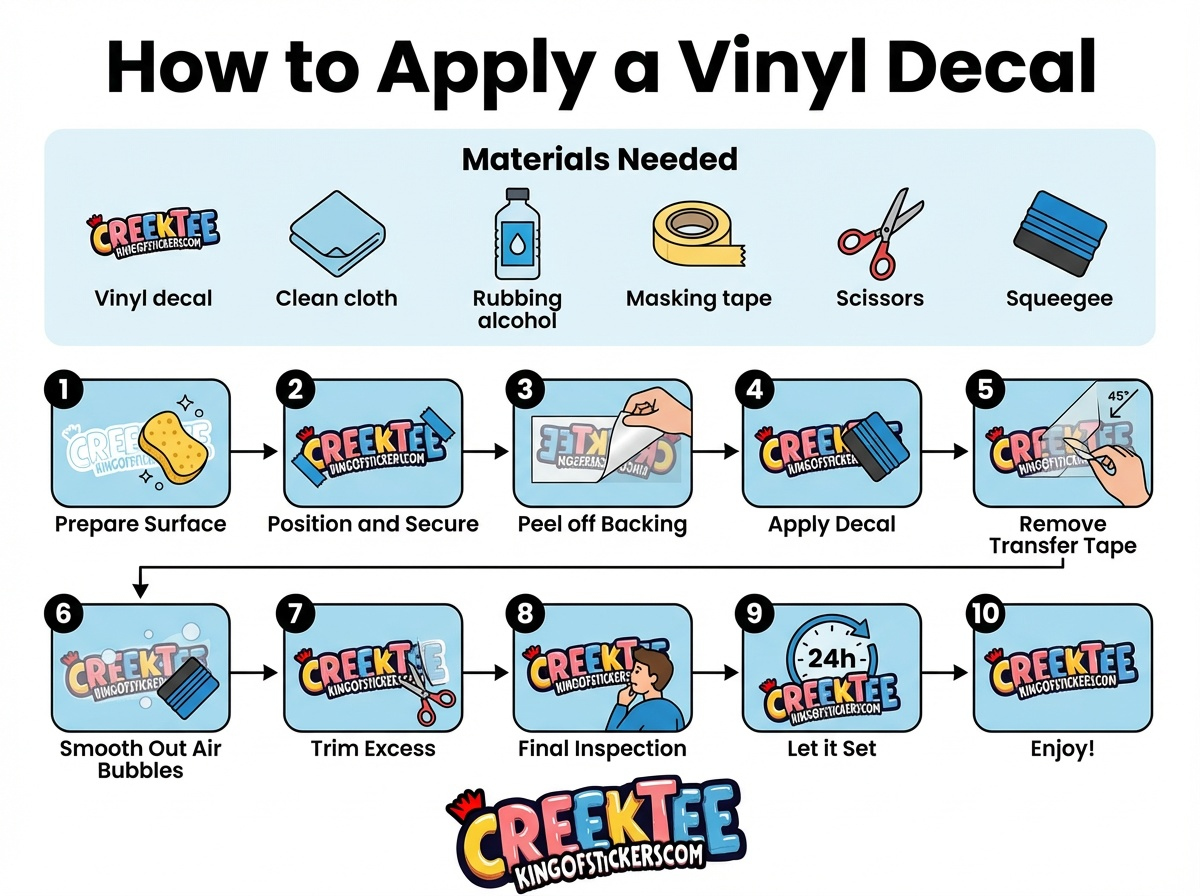
Materials Needed:
- Vinyl decal
- Clean, lint-free cloth or microfiber towel
- Rubbing alcohol or a mild cleaning solution
- Masking tape or painter's tape
- Scissors or craft knife
- Squeegee or a credit card
Step-by-Step Instructions:
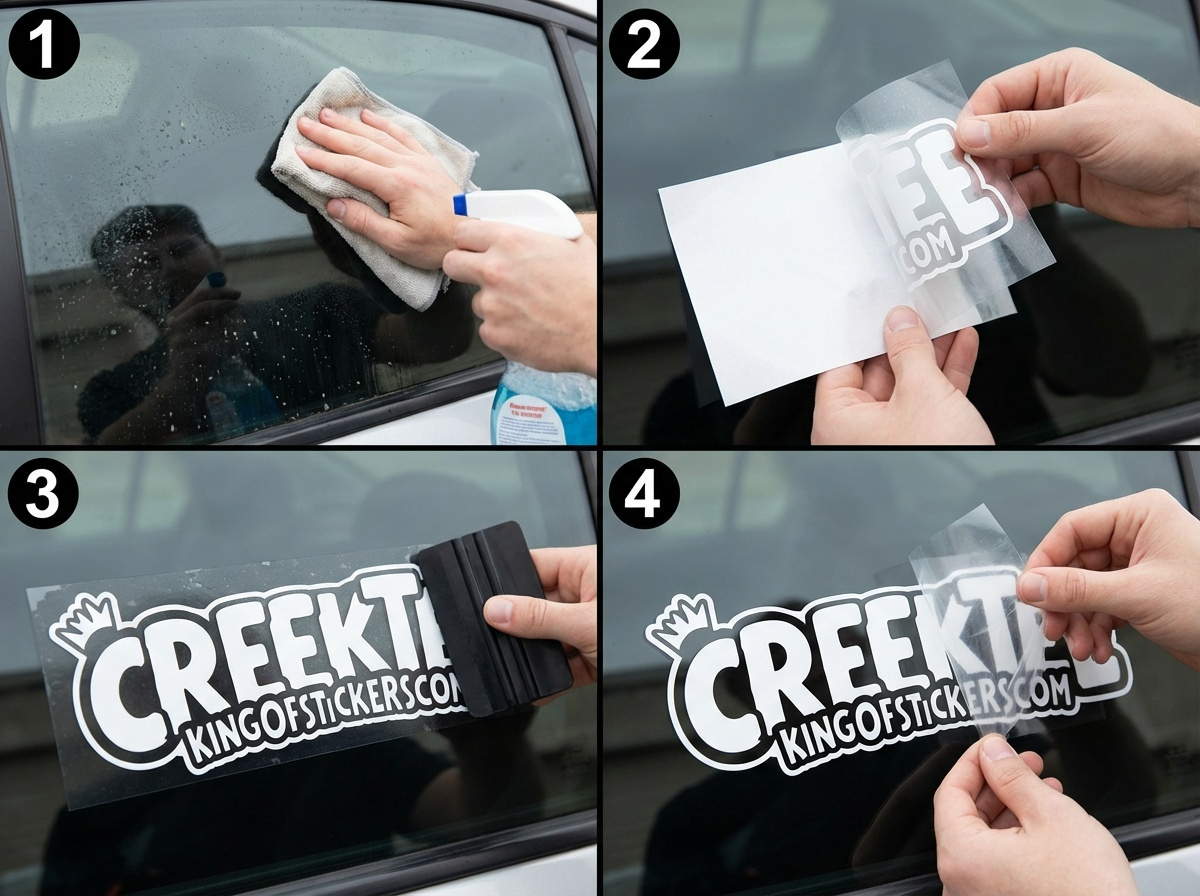
- Prepare the Surface: Clean the surface thoroughly where you plan to apply the decal. Use rubbing alcohol or a mild cleaning solution to remove any dirt, dust, or grease. Ensure the surface is dry before proceeding.
- Position and Secure the Decal: Position the decal on the surface using masking tape to temporarily hold it in place. Step back and check the alignment and positioning to ensure it's where you want it.
- Peel off the Backing: Carefully peel off the backing paper from the decal, exposing the adhesive side. Take care not to touch the adhesive surface with your fingers.
- Apply the Decal: Starting from one edge, slowly press the exposed adhesive side onto the surface. Use a squeegee or credit card to smooth out the decal, working from the center outward. This helps remove air bubbles and ensures a tight bond.
- Remove Transfer Tape: If your decal comes with transfer tape, carefully peel off the transfer tape at a 45-degree angle. This should be done slowly and steadily to avoid lifting the decal. Ensure that the vinyl sticks to the surface as you peel off the transfer tape.
- Smooth Out Air Bubbles: If any air bubbles are trapped under the decal, use a squeegee or credit card to push them towards the nearest edge. Smooth out the decal surface until all bubbles are removed.
- Trim Excess Material (if necessary): If your decal has excess material, trim it using scissors or a craft knife. Be careful not to cut into the decal itself.
- Final Inspection: Step back and inspect the applied decal for any imperfections. Smooth out any remaining bubbles if needed.
- Let it Set: Allow the decal to set and adhere to the surface for at least 24 hours before exposing it to extreme weather conditions or washing.
Tip: Following these instructions should result in a well-applied vinyl decal.
How to Apply a Vinyl Window Cling
Materials Needed:
- Vinyl window cling
- Water spray bottle
- Clean, lint-free cloth or squeegee
- Clean glass surface

Step-by-Step Instructions:
- Clean the Glass Surface: Ensure the glass surface is clean and free of dirt, dust, or grease. Use a glass cleaner if needed and let it dry completely.
- Prepare the Window Cling: Remove the window cling from its backing paper. Handle it carefully to avoid wrinkles or creases.
- Apply Water to Glass: Apply a generous amount of water spray to the glass surface where you want to place the window cling. The water helps position the cling and makes it easier to adjust.
- Position the Window Cling: Place the window cling onto the wet glass surface. The water allows you to slide and position it exactly where you want it.
- Smooth Out Air Bubbles: Use a squeegee or clean cloth to smooth out any air bubbles, working from the center outward. Press gently to ensure good contact with the glass.
- Let it Set: Allow the window cling to sit and adhere to the glass. The water will evaporate, and the cling will stick securely to the surface.
Tip: Window clings are reusable! Simply peel them off when needed and reapply using the same method.
Single-Use Translucent Vinyl Stencil – Application Instructions
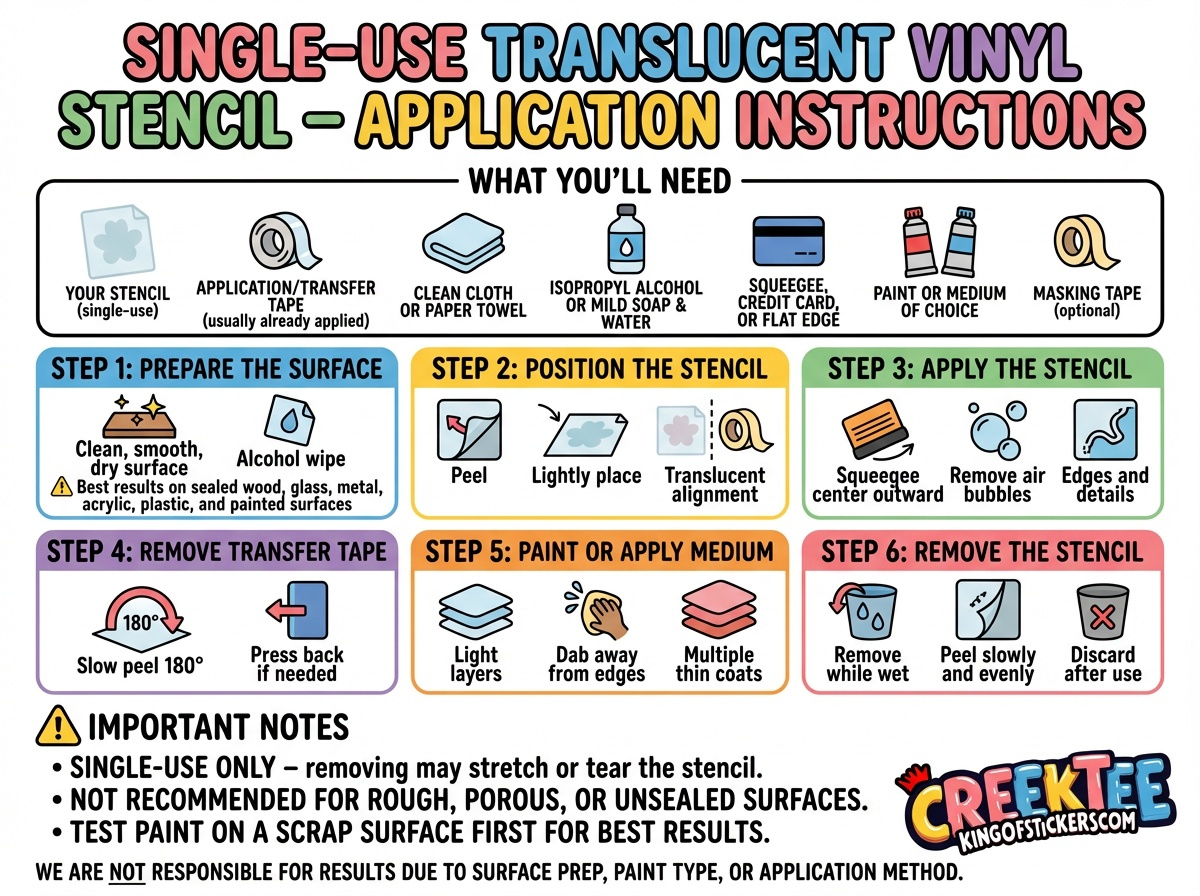
What You'll Need:
- Your stencil (single-use)
- Application/transfer tape (usually already applied)
- Clean cloth or paper towel
- Isopropyl alcohol or mild soap & water
- Squeegee, credit card, or flat edge
- Paint or medium of choice
- Masking tape (optional)
Step-by-Step Instructions:
Step 1: Prepare the Surface
- Apply only to a clean, smooth, dry surface.
- Wipe the area with isopropyl alcohol or soap and water.
- Let dry completely before applying.
Best results on sealed wood, glass, metal, acrylic, plastic, and painted surfaces.
Step 2: Position the Stencil
- Peel the stencil (with transfer tape still attached) from its backing.
- Lightly place it onto the surface—do not press firmly yet.
- Use the translucent material to align the design precisely.
- Tape in place if needed to prevent shifting.
Step 3: Apply the Stencil
- Starting from the center, use a squeegee or card to press the stencil down.
- Work outward to remove air bubbles.
- Pay special attention to edges and fine details.
Step 4: Remove Transfer Tape
- Slowly peel the transfer tape back at a sharp angle (180°).
- If any stencil pieces lift, press them back down and continue slowly.
Step 5: Paint or Apply Medium
- Use light layers of paint—do not overload.
- Dab or brush away from stencil edges to prevent bleed.
- Multiple thin coats are better than one thick coat.
Step 6: Remove the Stencil
- Remove the stencil while paint is still slightly wet.
- Peel back slowly and evenly.
- Discard stencil after use (single-use product).
Important Notes
- Single-use only – removing may stretch or tear the stencil.
- Not recommended for rough, porous, or unsealed surfaces.
- Test paint on a scrap surface first for best results.
- We are not responsible for results due to surface prep, paint type, or application method.
👕 HTV Printed T-Shirt Care Instructions

To keep your new shirt looking awesome for as long as possible, please follow these care tips:
🕒 Before Washing
- Wait 24 hours after receiving your shirt before washing.
- This allows the HTV print to fully cure and bond to the fabric.
🧼 Washing
- Turn the shirt inside out before washing.
- Wash in cold water only.
- Use a gentle cycle.
- Avoid bleach, fabric softeners, or harsh detergents.
🌬 Drying
- Hang to dry for best results
- or
- Tumble dry on low heat.
- Avoid high heat — heat is the enemy of HTV longevity.
🔥 Ironing
- Do not iron directly on the design.
- If ironing is needed, turn the shirt inside out or place a cloth over the print.
- Use low heat only.
🚫 What to Avoid
- No dry cleaning
- No high heat drying
- No scraping or picking at the design
👑 Pro Tip
Treat your shirt gently and it'll stay bold, bright, and wearable for a long time!
How to Care for Your Magnetic Bumper Sticker

Magnetic bumper stickers are reusable and easy to remove—but a little care goes a long way!
Proper Use
- ✔️ Apply only to clean, flat metal surfaces (steel body panels).
- ❌ Will not stick to aluminum, fiberglass, plastic, or vinyl wraps.
- Avoid placing over body lines, curves, or deep contours.
Before Applying
- Clean both the vehicle surface and the magnet with a damp cloth.
- Dry completely before applying to prevent moisture buildup.
Ongoing Care
- 🔁 Remove and reposition at least once per week
- Clean and dry both surfaces to prevent dirt buildup and paint marks.
- 🧼 Hand wash only if cleaning the vehicle
- Remove magnet before automatic car washes or pressure washing.
Weather & Driving Tips
- 🌬️ Remove magnet before high-speed driving or long highway trips.
- ❄️ Remove in extreme heat or freezing temperatures.
- Prolonged exposure to sun, heat, or moisture may cause fading or reduced grip.
Storage
- Store flat when not in use.
- Keep away from heat sources.
- Do not fold, roll, or bend the magnet.
Important Notes
- Extended use without removal may cause paint discoloration or "ghosting."
- Magnetic stickers are not intended for permanent use.
- We are not responsible for damage caused by improper use, surface type, or weather exposure.
How to Apply a Die-Cut Sticker

What You'll Need:
- Your die-cut sticker
- Clean cloth or paper towel
- Mild soap & water or rubbing alcohol
- Squeegee, credit card, or flat edge
Step-by-Step Instructions:
Step 1: Clean the Surface
- Apply only to a clean, smooth, dry surface.
- Clean with soap & water or rubbing alcohol.
- Let the surface dry completely.
✔️ Best surfaces: glass, metal, plastic, laptops, water bottles, smooth painted surfaces
❌ Avoid: textured, dusty, oily, or rough surfaces
❌ Avoid: textured, dusty, oily, or rough surfaces
Step 2: Position the Sticker
- Before peeling, place the sticker on the surface to check positioning.
- Once applied, repositioning may damage the adhesive.
Step 3: Apply the Sticker
- Slowly peel the sticker from the backing.
- Place one edge down first, then gently lay the rest of the sticker down.
- Use a card or squeegee to press from the center outward, removing air bubbles.
Step 4: Final Press
- Firmly press along all edges and fine details.
- For best results, allow the adhesive to set for 24 hours before washing or heavy handling.
Tips for Best Results
- Apply at room temperature (ideally 10°C–30°C / 50°F–85°F).
- If bubbles appear, push them to the edge with a card.
- Small bubbles usually disappear within 24–48 hours.
Care & Notes
- Hand wash only when applied to drinkware.
- Not dishwasher safe unless stated otherwise.
- Outdoor exposure may reduce lifespan over time.
Important Note
We are not responsible for damage due to improper application or surface type.
How to Apply Your BIC Lighter Sticker Wrap
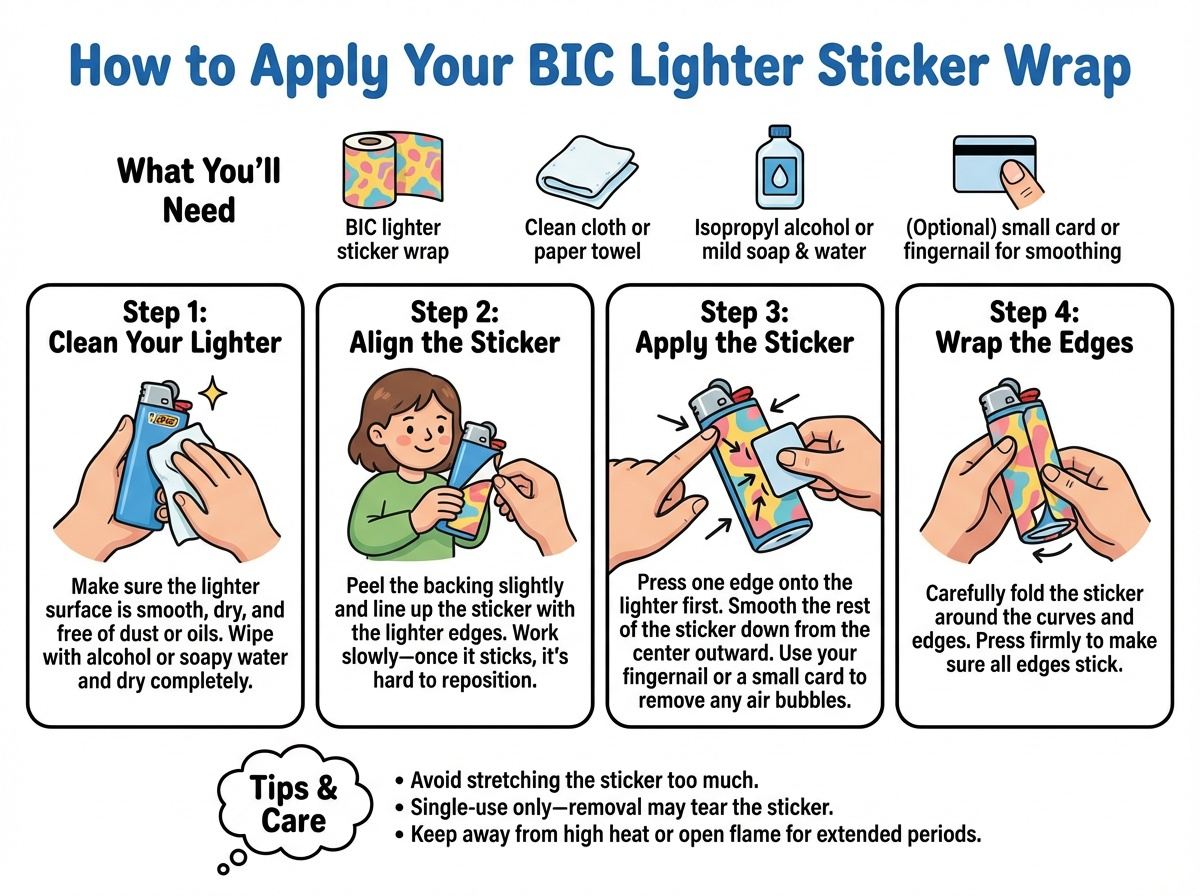
What You'll Need:
- BIC lighter sticker wrap
- Clean cloth or paper towel
- Isopropyl alcohol or mild soap & water
- Optional: small card or your fingernail for smoothing
Step-by-Step Instructions:
Step 1: Clean Your Lighter
- Make sure the lighter surface is smooth, dry, and free of dust or oils.
- Wipe with alcohol or soapy water and dry completely.
Step 2: Align the Sticker
- Peel the backing slightly and line up the sticker with the lighter edges.
- Work slowly—once it sticks, it's hard to reposition.
Step 3: Apply the Sticker
- Press one edge onto the lighter first.
- Smooth the rest of the sticker down from the center outward.
- Use your fingernail or a small card to remove any air bubbles.
Step 4: Wrap the Edges
- Carefully fold the sticker around the curves and edges.
- Press firmly to make sure all edges stick.
Tips & Care
- Avoid stretching the sticker too much.
- Single-use only—removal may tear the sticker.
- Keep away from high heat or open flame for extended periods.